Remove Binkiland Search: Binkiland virus removal from Chrome, Firefox, IE
This post is all about the brain-teasing Binkiland Search malware and includes the highlights of its corrupt characteristics as well as removal steps.
Adware programs aren’t really about destruction, identity theft or other critical risks that some viruses can call forth. In fact, they aren’t supposed to be harmful since the vector of those attacks implies moderate computer impact. What adware does do is exploiting the web traffic on any given machine to its designer’s advantage. The Binkiland app indulges in exactly that, hijacking the settings that determine basic web browsing patterns on the infected system. More specifically, the distorted values are the homepage, search provider and new tab page for whatever browser is detected on the compromised box. Since this particular sample is pretty elaborate and cross-browser, it hits Internet Explorer, Firefox and Chrome alike.
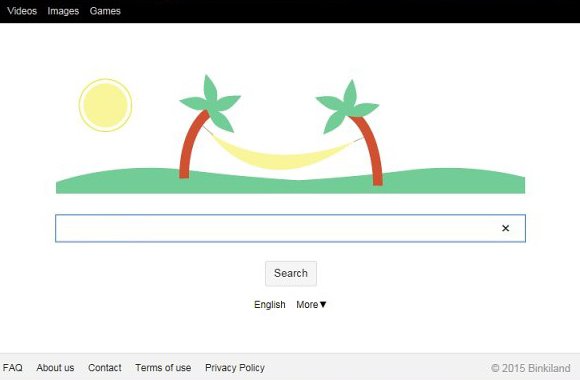
Above is an image of a site that will be constantly accompanying your stay online in case you are infected. This is binkiland.com, the URL that automatically replaces the preferences listed above. The twist happens after the malicious code is transformed into a browser add-on whose highly intrusive features are out of the question. Throughout this whole process, no approval from the user is requested in any obvious form, so you don’t really have influence upon the scenario. But let’s rewind this workflow a little bit and see how Binkiland actually made it into your computer, given that you never let it in.
Not uncommonly for adware, this one sticks to a freeware bundling model. It means that the app infiltration is much like a drive-by download. The Binkiland payload can be part of a heap of extra promotions for the affiliated free file downloader, media player, some weird system helper tools or bugged variants of legit updates to software like Java and Adobe Reader. What makes this distribution successful is that users aren’t always presented with unambiguous information about the stuff which is being hauled inside along with the application of interest. So, getting back to the intrusion, the process is made blurred on purpose.
What ultimately happens post-infection is binkiland.com gets visited all the time. Plus, the software called Binkiland browser may be forced upon you as your default one. In order to stop that activity from making a mess of your online life, don’t hesitate to kick it out of your PC using the tips below – the instructions have been tested and they proved to work well.
Binkiland Search removal with automatic cleanup tool
An optimal workflow for eliminating the Binkiland virus is to leverage a security application which will identify all potentially malicious software on your computer and handle it the right way. This approach ensures thoroughness of the removal and system remediation, and allows avoiding unintended damage that might occur as a result of manual malware deletion.
1. Download and install Binkiland Search removal software. Launch it and click the Start New Scan button. Wait for the application to check your computer for threats

Download Binkiland.com remover
2. When the app is done scanning your system, it will come up with an extensive list of detected objects. Click the Fix Threats option to have the utility completely remove this adware and affiliated infections found on your PC.
Uninstall troublemaking software through Control Panel
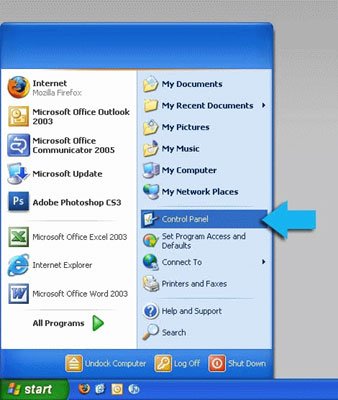
– Go to Start menu and select Control Panel on the list
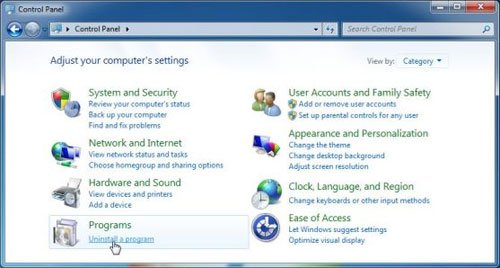
– Click on the Uninstall a program (Add or Remove Programs) button
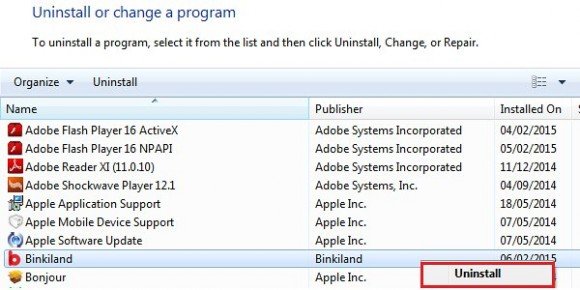
– Take a good look at the software list displayed. Search for Binkiland or WSE_Binkiland. When found, the culprit should be uninstalled
– Note that Binkiland Search may not be listed on Control Panel therefore it may be problematic to figure out which particular program is associated with the virus in your case. If you are unsure, stick to the automatic cleanup advice and / or try the workarounds described below.
Remove Binkiland virus from compromised browsers
This part of the guide encompasses easy-to-follow steps required for terminating the activity of the adware under consideration on major web browsers it affects.
Binkiland.com removal for MS Internet Explorer
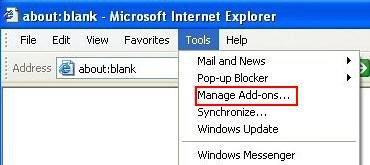
– Go to Tools –> Manage add-ons

– When on the Manage add-ons interface, click on Search Providers in its left-hand section and select a service that you would like to use as your preferred engine by right-clicking it and picking Set as default option. Also, do not fail to eliminate Binkiland from this list by clicking the Remove button
– Select Toolbars and Extensions item on the same screen, find the Binkiland entry there, highlight it and click the Disable button at the bottom
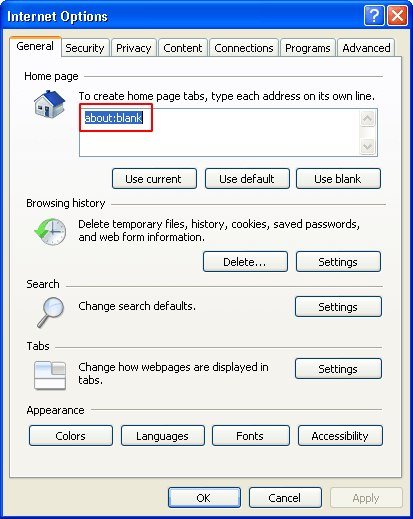
– In order to set the preferred IE homepage, select Internet Options under Tools, then proceed to the General tab and type in the desired address under Home page instead of binkiland.com
Binkiland.com removal for Mozilla Firefox
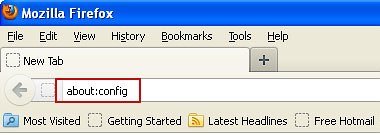
– Type about:config in the address bar and hit Enter

– When Firefox comes up with the warranty alert, read it and click the confirmation button as shown on the image below
– Type binkiland in the Search field and press Enter. Doing so will return en entire list of Firefox preferences associated with this adware. Right-click on every one of these entries and select Reset from the menu each time
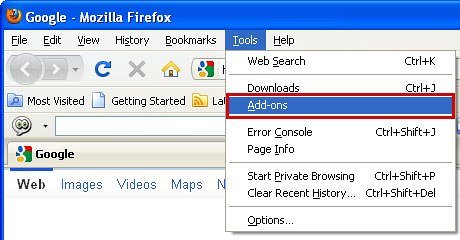
– Go to Tools and select Add-ons

– Proceed to Extensions and remove the one related to Binkiland

– Go to Change Search Settings… as shown below
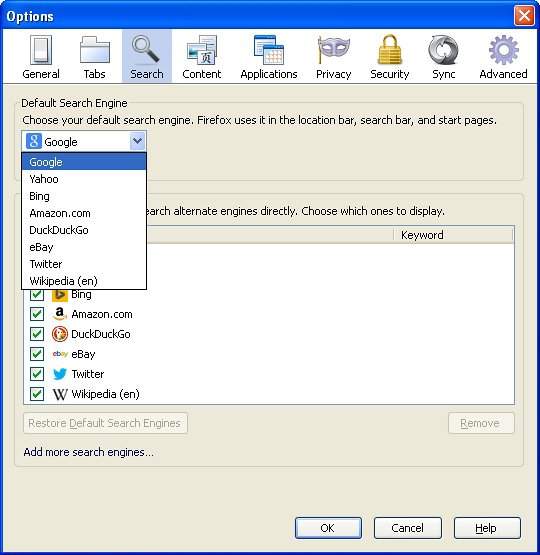
– Select the default search engine instead of Binkiland and save the changes
Binkiland.com removal for Google Chrome
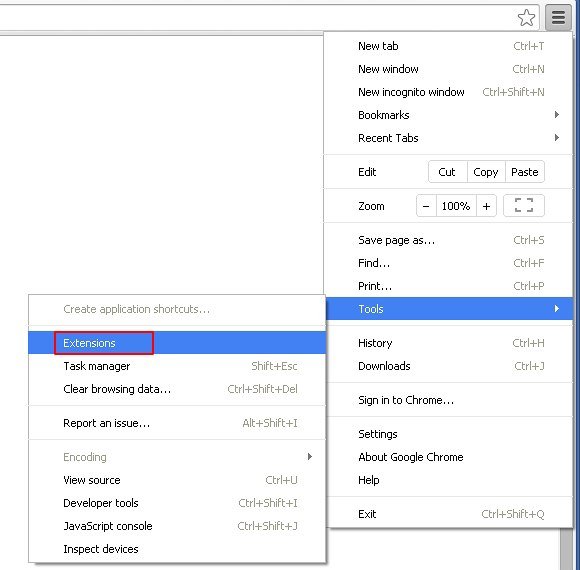
– Click on the Chrome menu icon, then select Tools –> Extensions
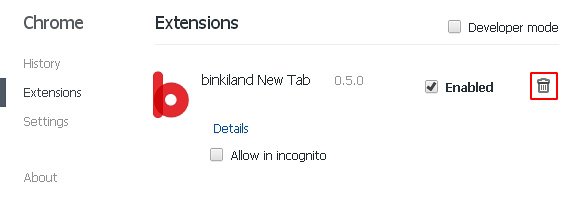
– Find Binkiland or other concordant item on the screen. When found, the unwanted object should be deleted by clicking on the trash bin next to it
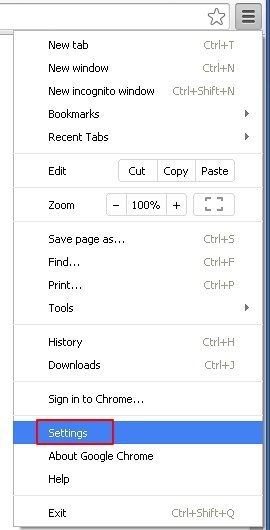
– Go back to the Chrome menu but now select Settings
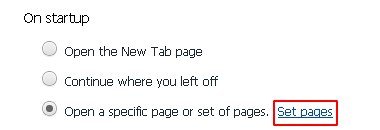
– Go to On startup sub-section, select Open a specific page or set of pages radio button, and click Set pages
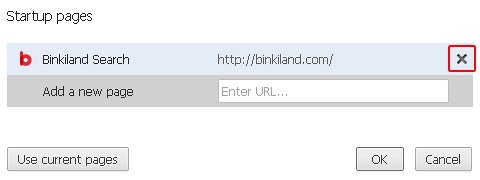
– Chrome will now come up with Startup pages interface, where you should locate Binkiland Search and remove it by clicking the X button as shown
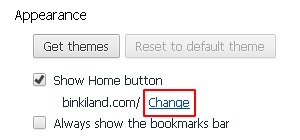
– In the sub-section called Appearance, make sure Show Home button is checked, and click the Change option
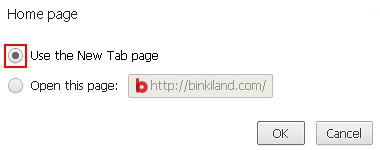
– Under Home page, select Use the New Tab page

– Go to the Search sub-section and click Manage search engines. Be sure to choose the search engine which will be used by default
Double-checking never hurts
To make sure the Binkiland hijacker has been removed, consider running an additional security scan as a completion of the cleanup procedure.

Download and install Binkiland Search removal software
Leave a Reply